Use APScheduler to Schedule Tasks: Update a Model in Django Daily (Real-World Example)
Learn how to use Advanced Python Scheduler with Django to Update a Model ...
APScheduler, short for ‘Advanced Python Scheduler’, is a task scheduler library for Django that allows you to create, modify, and run scheduled tasks on your Django website. For this article, we will be following the APScheduler User Guide.
Real World Example: A Django Contact Relationship Management System (CRM)
At time of writing, I am coding a Contact Relationship Management (CRM) system in Django. Part of the functionality of the CRM is to send birthday reminders to the user when one of their contacts has a birthday coming up.
We will need a scheduled task to regularly update the number of days until the event, and send out reminders if the anniversary is approaching.
Our CRM has the following models:
Users - The logged-in user who is using the site
Contacts - People the user wants to add to their CRM database.
Events - Annual events related to a contact, like a birthday.
Update Model the First Time It’s Created:
Before we talk about how to schedule tasks with APScheduler, there’s a scenario that may come up for you when scheduling your tasks, which is that you may need your Django model updated when a new object instance is created, rather than waiting for your next scheduled task to run.
The task we will be scheduling for the CRM is that we want to regularly check how many days are remaining until the next ‘event celebration date’, so a user can be reminded to send a card, flowers, or gift to their contact.
We can write a scheduled task to check how many days are remaining until the next celebration, but we also need to update the model the first time the object is created, so it has a value right away.
To solve for that, you just need to override the Django default save() method.
Inside our Event model (below), the save() method runs the days_until_event_calc() method, which returns the remaining number of days until the event and saves that to the model when it’s created.
Screenshot: The ‘Event’ model has a custom method called 'days_until_event_calc()’ that checks how many days are remaining until the next anniversary of the event — and saves the result to the database.
Doing this ensures that when an event is created, the ‘days remaining until event’ celebration date can be automatically updated when a new event is added.
Now that we have that scenario accounted for, we just need to:
Create instructions file for APScheduler
Configure APScheduler to Run Scheduled Tasks
Create Scheduled Tasks File for APScheduler:
First, we create a file called ‘clock.py’ — you can name it whatever you’d like, but this is the one recommended by Heroku in their tutorial on this topic.
Inside the ‘clock.py’ file will we will write some scheduled tasks to be executed and decorate them with APScheduler decorators, which will define our scheduled task interval timing.
There are a variety of options you can choose when setting up your scheduled tasks using APScheduler. There’s too many to go over here, but you can read about all of them in the APScheduler User Guide.
To accomplish the task of checking for the number of days remaining, and updating the user model, we choose the BackgroundScheduler. As the name suggests, method can run in the background without causing any delays to users visiting the site.
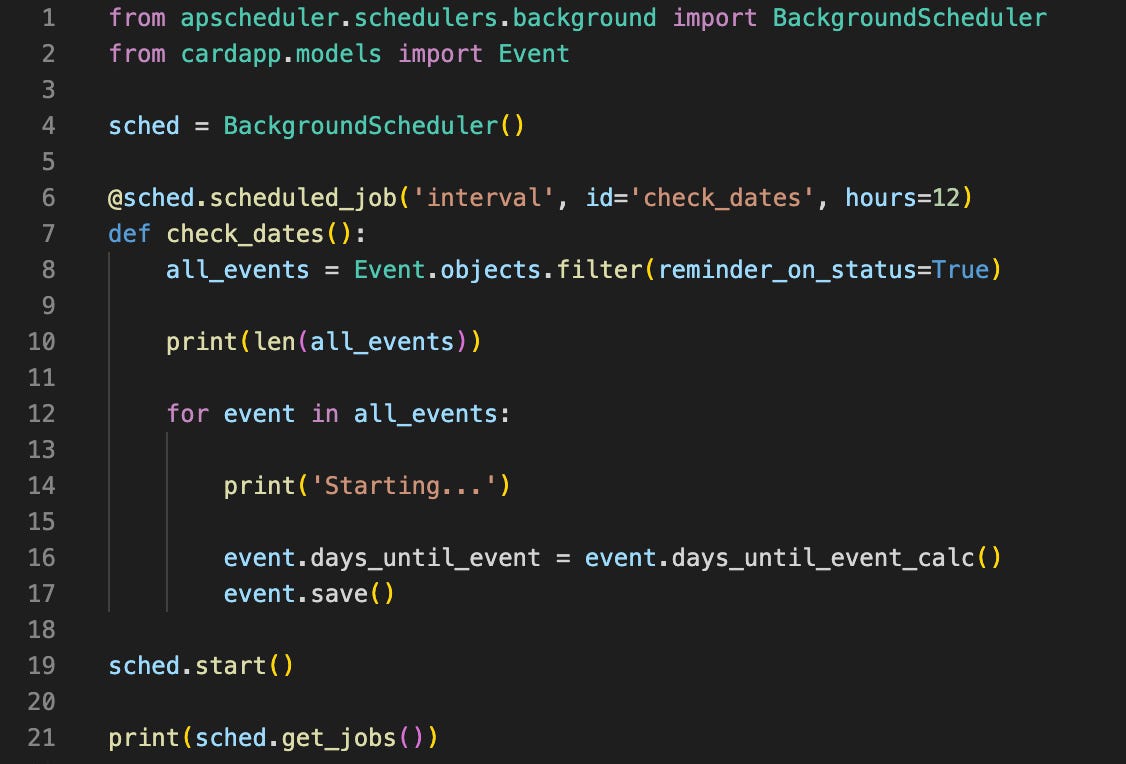
Screenshot: We import APScheduler BackgroundScheduler, import the model we want to update, and create an instance of the BackgroundSchedule.
Then, we set up our APScheduler options in the @sched.scheduled_job decorator. Inside of a function called ‘check_dates()’ we run the custom method, ‘days_until_event_calc()’ from the Event model and update the value.
Connect Scheduled Tasks to Django:
At this point, everything is looking good, except we run into one problem: If we try to run our file now, it won’t work. The clock.py file is being called outside of the Django context, so it has no idea how to find our Event model.
It doesn’t know ‘what a Django is’ or how to do anything with it. We need to connect the two pieces by starting the clock.py script from within the Django context — after Django is already running.
The easiest way I found to do that is to create a custom Django management command, which will call the clock.py file from the Django context and allow the script to integrate fully with the rest of your project.
Create a new folder structure in your Django app like this:
your_app/management/commands/Add blank __init__ files to each level, so Python knows to run them as packages. Learn more about that here.
Add your clock.py file in that folder.
We can now run the custom command from any file within the Django context that runs once when the server starts, such as models or views. I found it made sense to add it in views.
At the bottom of your views.py file, import the ‘call_command’ function and call the ‘clock’ management command to start your scheduled task.
That’s all there is to it! Our scheduled tasks will now run.


